Key Steps for Optimum Forage Establishment

Amanda Grev, Pasture & Forage Specialist
University of Maryland Extension

Last month we discussed strategies for assessing pasture stands and some initial considerations when beginning to think about pasture renovations. Now that August has arrived, if you have decided to proceed with some form of pasture renovation this fall it will soon be time for planting. Regardless of the extent of your renovation, there are several steps you should follow to make sure the seeding process goes smoothly. Below is an overview of the key steps necessary for optimum forage establishment.

Step 1: Correct Soil Fertility

Poor soil fertility is one of the most common causes of poor stand establishment and also poor stand persistence over time. Acidic conditions (low soil pH) will reduce nutrient availability and impair root growth and development, and essential nutrients like phosphorus are critical for proper seedling development. Because of these effects on plant nutrient availability and utilization, ensuring adequate soil pH and fertility is essential for optimum stand establishment and to obtain persistent, high-yielding stands long term. Soil fertility testing should be done prior to renovation so that lime and fertilizer can be applied according to soil test recommendations.

Step 2: Control Weeds

Weeds compete with desirable forages for light, nutrients, moisture, and space and can shade out or outcompete new seedlings. For best results, ensure weeds are controlled prior to seeding. Remember that while herbicides can be a useful tool for weed management, they are not the only option for weed control. An integrated approach that combines various cultural, mechanical, and chemical control practices will be the most successful.

Step 3: Select Adapted Species

Not all forages will perform equally on different sites, so be sure to select forages that are well suited for your soil and site characteristics. This includes variables such as soil type, drainage, moisture holding capacity, pH, fertility, and topography. For example, species such as orchardgrass or alfalfa require a higher level of fertility and will not thrive in systems with low soil pH or poor soil fertility. Be sure to select forage species that will match your intended use (hay vs. pasture, perennial vs. annual, time of year, management system) and livestock requirements based on species, age, and life stage.

Step 4: Inoculate Legume Seeds

If you plan to incorporate a legume as part of your forage mix, be sure the seed is properly inoculated with nitrogen-fixing bacteria. Some legume seeds come pre-inoculated, which saves time and helps to ensure inoculation. If not, be sure to select the appropriate inoculant strain depending on the legume species and inoculate the seed with fresh inoculant prior to seeding using an effective adhesive material to hold the inoculant on the seed. Inoculants are living organisms and will only work if the bacteria are alive when applied, so be sure to use proper storage and handling and check expiration dates.

Step 5: Graze and/or Clip Close

Grazing or clipping a pasture close to ground level prior to seeding will help eliminate residue and assist in suppressing competition from existing vegetation, giving new seedlings an opportunity to grow. If using livestock to accomplish this via grazing, be mindful of the potential effects this may have on animal performance, including the consumption of lower quality forage and/or the potential for increased parasite loads as animals graze below the usual minimum height recommendation.

Step 6: Prepare a Proper Seedbed

This step will vary slightly depending on the use of tilled vs. no-till seedings. If using tillage, be sure the seedbed is soft yet firm following tillage. An underworked seedbed will have too much surface residue and will be too rough for good seed placement, while an overworked seedbed will be too fluffy and fine and will dry out quickly. A good rule of thumb is that your boot tracks should be around ¼ inch deep. For no-till seedings, it is especially important to suppress the existing stand and reduce residue prior to planting. In addition to close grazing and/or clipping, the existing stand can be suppressed using a nonselective herbicide.

Step 7: Seed at the Proper Depth

Seeding too deep is one of the most common causes behind establishment failures. Be sure the seed drill is calibrated appropriately so that seed is placed at the proper depth. Take into account your soil type, texture, and moisture conditions; in general, seed should be placed slightly shallower in a heavier soil with a higher moisture content and slightly deeper in a lighter soil with lower moisture content. For most cool-season forages, the ideal seeding depth is ¼ to ½ inch, but seed characteristics vary so be sure to determine the optimum depth and adjust accordingly prior to planting. The key is to provide good seed to soil contact without placing the seed too deep.

Step 8: Seed at the Proper Time

Cool-season forages can be seeded in either the spring or late summer. Advantages of late summer seedings generally include reduced weed competition and cooler weather conditions during establishment. The ideal time will vary depending on your location and weather conditions but in general, the optimum time for late summer seeding in Maryland occurs from mid-August through mid-September.

Step 9: Seed at the Proper Rate

Similar to seed depth, calibration is essential to achieve a proper seeding rate. Seeding rates will vary based on forage species selection, be sure to follow recommendations when making seeding rate decisions. Pasture seeding rates are typically higher than hay seeding rates to provide a denser sod for grazing. Seeding rates can be adjusted slightly based on conditions at the time of seeding. If conditions are optimum, seed at the lower end of the recommended range. If conditions are poor, seed at the higher end of the recommended range.

Step 10: Manage New Seedings During Establishment

New seedings are especially sensitive during their establishment year. To maximize success, delay grazing on newly seeded areas until sufficient root systems have been developed to prevent livestock from uprooting newly established plants when grazed. Avoid grazing new stands during extremely wet periods, be very careful not to overgraze, and continue to scout for weeds or other potential issues that can impair establishment.

 

Assessing Pastures in Preparation for Fall Pasture Renovation

Amanda Grev, Pasture and Forage Specialist
University of Maryland Extension

With the current warm temperatures it may feel like fall is still far away, but the end of summer will be here before we know it and now is the time to be thinking ahead about plans for pasture renovation this fall. Despite our best managerial efforts, many of our forage stands will eventually require some form of renovation. Whether we have simply let our fertility slip, lapsed a little in our harvest management, allowed some fields to become overgrazed, or some weeds have taken over and outcompeted the desirable forages, an unproductive pasture is often the result. Couple this with the severe drought and extreme wet conditions that Mother Nature has all too often thrown our way in recent years and we may find ourselves scratching our heads and wondering how we got here and what to do about it.

The first step is to recognize that poor forage stands are often a symptom of an underlying cause. More often than not, the major causes of poor pasture productivity include a lack of adequate fertilization and/or poor grazing or harvest management. If this is the case, keep in mind that if a stand is thin as a result of poor soil fertility or overgrazing, the problem will not correct itself just because you’ve added more seed. To achieve real success, these underlying issues will need to be corrected. If environmental conditions such as flooding or drought are at fault, we can work to overcome those by selecting species or varieties that will be more resilient to those conditions moving forward.

Along those lines, one other point of note is that renovation does not always require completely starting over with a full reseeding. Renovation can also occur in the form of improvements in management, better fertilization and weed control, the addition of legumes into grass pastures, or overseeding into thinner areas.

When deciding whether or not renovation is needed, take some time to assess the current condition of your pastures. Are they performing as well as you would like? Has there been excess damage from environmental conditions? How well have you been managing the stand? Are there a lot of undesirable species or weeds present? In addition to asking yourself these questions, an objective assessment of the pasture stand can be helpful. One such assessment is the step-point method, which involves walking through each pasture in a random pattern and noting the forage species (or lack thereof) at various locations throughout the pasture (see specific steps below). Recording these observations allows you to objectively calculate the vegetative cover and percent desirable forages for a given field. In addition, take note of other key indicators such as forage diversity, plant vigor, presence of insect or disease damage, signs of erosion, or other observations as you walk.

If damage is light and there is a high proportion of desirable species and a low proportion of bare ground or undesirable weeds, then some rest, fertility, and weed control might be all you really need. If the damage is more moderate, perhaps frost seeding in some clovers or overseeding the worst areas would also help. If you have a low proportion of desirable species and a higher proportion of bare ground or undesirable weeds, you may want to consider terminating the existing stand and reestablishing the field with a suitable forage species based on your farm, your system, and your needs.

If you do decide to fully renovate, you have several options. The renovation process is a chance to upgrade your forage system and to capitalize on new and improved forage genetics. You may decide to do a rotation or two with an annual forage as a smother crop to help suppress weed populations, prevent soil erosion, build soil fertility, mitigate soil compaction, and provide a high quality forage source during the renovation process prior to planting the field back into a perennial stand. Either way, there are several steps you should follow to make sure the reseeding process goes smoothly, so start thinking ahead on some of the necessary steps moving forward. Think about forage options that will work for you and look for good quality seed to purchase. If you don’t have a recent soil test, take some soil samples and begin correcting any soil pH or fertility deficiencies. If weeds are a problem, be sure to allow adequate time to achieve good weed control and still be able to plant in a timely manner. Recognize that in some situations a single herbicide application may not always be enough, and be mindful of any herbicide carryover that might affect seeding.

No matter how you decide to proceed, now is the time to be thinking ahead and making plans for this fall. Stay tuned next month for an overview of the key steps for optimum forage establishment and some common establishment mistakes to avoid.

The Step-Point Method for Pasture Vegetative Cover Assessment
Step 1 Denote or mark a specific spot on the tip or edge of a shoe or boot.
Step 2 Based on the major species present in your pasture, determine which forage species to include as categories. As an example, you could include tall fescue, orchardgrass, Kentucky bluegrass, white clover, red clover, other legume, other grass, undesirable species (weeds), and bare ground.
Step 3 Walk through the pasture in a random zig-zag pattern stretching from one end of the field to the other. Avoid walking near gates, waterers, laneways, or other heavily used areas. Every 10 to 20 steps (depending on pasture size), stop and take note of what is directly under the designated spot on your shoe. The spot will fall directly on top of a specific plant species, make a mark for or write down which forage species (or bare ground) is present based on your pre-determined categories.
Step 4 After recording 50-100 stops, add up the number of marks for each forage species or category and calculate the percentage of each species.
Step 5 Repeat the above steps for each pasture.


Optimizing Drying for Hay and Haylage

Amanda Grev, Pasture & Forage Specialist
University of Maryland Extension

Along with making corn and soybean planting a challenge, spring rains make for a challenging forage harvest as well. The faster we can get our hay or haylage dry enough to bale or wrap, the more we can reduce the risk of rain damage and retain a higher quality end product. Follow these guidelines to help optimize drying time during forage harvest this spring.

The Forage Drying Process

Let’s think for a moment about the basic principles behind forage drying. When forage is cut, it is around 75 to 80% moisture but it must be dried down to 60 to 65% moisture for haylage or 14 to 18% moisture for dry hay. During this wilting and drying process, plants continue the natural process of respiration, breaking down stored sugars to create energy and carbon dioxide. The longer it takes the forage to dry, the longer the forage continues to respire in the field. Data suggests that 2 to 8% of the dry matter may be lost due to respiration, resulting in energy losses and an overall reduction in forage quality. This means that a faster drying time will not only get the forage off the field faster but will also lower the amount of dry matter and nutrients lost through respiration.

The drying process happens in several distinct phases; knowing and understanding these phases can help us manage our forage in a way that will maximize drying rates and ensure nutrient retention within the harvested forage.

Phase One: Moisture Loss via Stomatal Openings

The first phase in the drying process is moisture loss from the leaves. This happens through the stomata, which are the openings in the leaf surface that allow for moisture and gas exchange between the leaf and the outside air. These stomata are naturally open in daylight and closed in darkness. After a plant is cut, respiration continues but gradually declines until the moisture content has fallen below 60%. Rapid drying in this initial phase to lose the first 15 to 20% moisture will reduce loss of starch and sugar and preserve more dry matter and total digestible nutrients in the harvested forage.

Solar radiation is the key to maximizing drying during this initial phase. This can be accomplished by using a wide swath (at least 70% of the cut area), which will maximize the amount of forage exposed to sunlight. A wider swath will increase the swath temperature, reduce the swath humidity, and keep the stomata open to allow for moisture loss, encouraging rapid and more even drying immediately after cutting. In contrast, narrow windrows will have higher humidity and less drying, allowing respiration to continue and leading to further dry matter and nutrient losses. Research has shown that a wide swath immediately after cutting is the single most important factor in maximizing the initial drying rate and preserving digestible dry matter. A full width swath will increase the drying surface of the swath by 2.8 times, and moisture reductions from 85 to 60% can be reached in as little as 5 to 7 hours. Haylage from wide swaths has been shown to have lower respiration losses during drying, greater total digestible nutrients, and more lactic and acetic acid, improving forage quality and fermentation.

During this phase, a wide swath is more important than conditioning. Most of the respiration takes place in the leaves. While conditioning is important for drying stems, it has less impact on drying leaves and therefore will have little effect on this initial moisture loss. This means that for haylage, a wide swath may be more important than conditioning.

Phase Two: Stem Moisture Loss

The second phase in the drying process includes moisture loss from the stems in addition to the leaves. Once moisture levels have dropped to the point where plant respiration ceases, the closing of the stomata traps the remaining moisture, slowing further drying. At this stage, conditioning can help increase the drying rate because it provides openings within the plant’s structure, providing an exit path for moisture and allowing drying to continue at a faster rate. For maximum effectiveness, be sure the conditioner is adjusted properly based on the stem thickness (roughly 5% of leaves showing some bruising) and choose the best conditioner based on your forage type. For example, roller conditioners are often preferred for alfalfa due to reduced leaf loss.

Phase Three: Loss of Tightly Held Water

The final phase of the drying process is the loss of tightly held water, particularly from the stems. Stems generally have a lower surface to volume ratio, fewer stomata, and a semi-impervious waxy cuticle that minimizes water loss so conditioning is critical to enhance drying during this phase.

Additional Factors

In addition swath width and conditioning, several other strategies can be used to improve drying time. Be sure to cut forages at the proper height, leaving 2 to 3 inches for alfalfa and 4 inches for cool-season grasses. Not only will this result in improved stand persistence, earlier regrowth, and sooner subsequent cuttings, but the stubble will help to elevate the swath and promote air flow and rapid drying. If possible, mow hay earlier in the day, preferably mid- to late-morning after the dew has dried off. This will allow for a full day of drying right away, maximizing exposure to sunlight and resulting in a faster drop in moisture and reduced respiration. And finally, raking should occur when the forage is above 40% moisture. Raking the forage while it is still pliable helps to reduce leaf loss and maintain forage quality. Adjust the rake to minimize the amount of tines touching the ground to avoid soil contamination.

In conclusion, cutting in the morning and using wide swaths to take advantage of sunlight is key to both faster drying and preserving digestible dry matter. Remember, a wide swath enhances leaf drying while conditioning expedites stem drying; both are needed to make high quality hay.

UME Forage Needs Assessment Survey

University of Maryland Extension (UME) is conducting a forage/pasture needs assessment. We want to hear from you, the producer, about challenges and resources you’d like to see generated from UME regarding forages.

Please follow this link to complete the survey and please feel free to forward to anyone you know that might be interested: https://ume.qualtrics.com/jfe/form/SV_8BUhhmnlVFvFEVL

Spring Weed Control for Pasture and Hayfields

Dr. Amanda Grev, Pasture & Forage Specialist
University of Maryland Extension

As things are greening up this spring, you may notice a few not-so-friendly plants popping up around your fields, especially given the milder weather this past winter. If you haven’t already done so, now is the time to scout your pastures and hayfields in search of winter annual and biennial weeds. When it comes to weed control, timing of herbicide application is critical and it is important to spray when weeds are most susceptible to achieve maximum effectiveness.

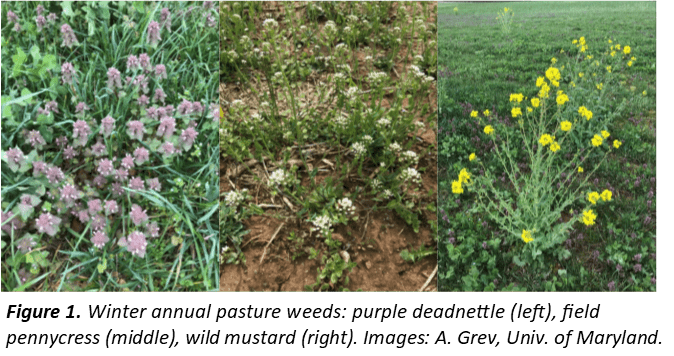
Winter annuals typically germinate in the fall, overwinter, and complete their reproductive cycle in the spring or early summer. Common winter annual species include chickweed, purple deadnettle, field pennycress, henbit, horseweed/marestail, shepherd’s purse, and the mustard species.  Annuals are best controlled during the seedling and early vegetative stage when they are young and actively growing. Herbicide applications will be more effective if made at this stage while they are still vegetative and more susceptible and will prevent them from flowering and producing seed.  At this time of year, these winter annuals are growing rapidly and have already or will soon begin to flower and set seed. If the winter annuals in your fields have moved beyond this stage, an application may offer some control but you may also want to take note of those weedy areas now and target them later this year with a late fall application.

Biennials live for two growing seasons, with the first year consisting of only vegetative growth as a seedling and rosette and the second year consisting of vegetative growth and also reproductive growth in the form of an elongated flower stalk. Common biennial species include burdock, bull thistle, musk thistle, and wild carrot. These weeds are best controlled during the seedling and rosette stage, and should be treated now while they are smaller and more susceptible and before they begin to bolt.

There are a number of herbicides available for control of broadleaf weeds. Herbicide selection should be based on the type of forage and weed species present. The most common herbicides used for control of broadleaf weeds in grass hay or pasture are the plant growth regulator herbicides, which includes products containing 2,4-D, dicamba, triclopyr, aminopyralid, picloram, or a mix of these (see the table below for a list of common products). These products are safe if applied to grass forages at the labeled rates but can kill or injure desirable broadleaf forages (i.e. clover) in grass-legume mixed pastures.

If weedy annual grasses such as crabgrass, foxtail, panicum, and Japanese stiltgrass are problematic, pendimethalin (Prowl H2O) now has a supplemental label that allows for its use on established perennial pastures or hayfields grown for grazing, green chop, silage, or hay production. It may be applied to perennial grass stands or alfalfa-grass mixed stands. Prowl H2O may be applied as a single application in the early spring, or for more complete control it can be applied as a split application with the first application in early spring and the second application after first cutting. Keep in mind, this herbicide is a pre-emergent herbicide, meaning it will only control weeds if applied prior to germination. If soil temperatures in your area are already above 50°F it is likely that crabgrass and stiltgrass has already germinated, but a split application of Prowl H2O now and after first cutting can help control foxtail. There are currently no herbicides labeled to control emerged weedy grasses in grass stands or alfalfa/grass mixes.

Note that if forages were recently seeded and are not yet established many of these herbicides can cause severe crop injury. Most herbicide labels for cool-season perennial grasses state that the grasses should be well established with at least 4-5 inches of growth, although some labels are more restrictive than this. In addition, some of these herbicides have haying or grazing restrictions following application. Always read and follow the guidelines listed on the product label for proper rates, timing, residual effects, and any grazing or harvest restrictions following application.

Lastly, remember that while herbicides can be a useful tool for weed management in pastures and hayfields, they are not the only option for weed control. A program that integrates several different control strategies is generally more successful than relying on a single method. For maximum results, include cultural practices such as selecting adapted species and maintaining optimum soil fertility, mechanical practices such as timely mowing or clipping to suppress weed seed production, and biological practices such as utilizing livestock for controlled grazing or browsing. And remember that weeds are opportunistic; the best method for weed control is competition with a healthy, dense stand of desirable forage species.

Product Active Ingredients Application Rate* General/Restricted Use
2,4-D 2,4-D 1 to 2 qt/A General
Banvel/Clarity dicamba 0.5 to 2 pt/A General
Crossbow 2,4-D + triclopyr 1 to 6 qt/A General
GrazonNext HL 2,4-D + aminopyralid 1.2 to 2.1 pt/A General
Grazon P+D 2,4-D + picloram 2 to 8 pt/A Restricted
Milestone aminopyralid 3 to 7 fl. oz/A General
PastureGard HL triclopyr + fluroxypyr 0.75 to 4 pt/A General
Prowl H2O pendimethalin 1.1 to 4.2 qt/A General
Remedy Ultra 4L triclopyr 0.5 to 4 pt/A General
Stinger clopyralid 0.7 to 1.3 pt/A General
Surmount picloram + fluroxypyr 3 to 6 pt/A Restricted
WeedMaster 2,4-D + dicamba 1 to 4 pt/A General

*For use in established grass pasture or hayfields


2020 Maryland Crop Production Meetings Announced

University of Maryland Extension has announced dates for this year’s crop production meetings that will be conducted around the state between December and March. The most recent research, information and data will be shared at these meetings and will help make 2020 growing decisions for agricultural crops. The meetings are open to all interested in agronomy, forage, vegetables and fruit. Private pesticide applicator and nutrient management credits will be offered. Be sure to call your local Extension office for further details and to get registered. If you need special accommodations please call at least one week prior to the event.

Agronomy Meetings

Southern Maryland Crops Conference 
December 3, 2019. 4:30—9:00 p.m.
Baden Fire Hall, Baden, MD.

Register by calling the Charles County UME Office at 301-934-5403.

Kent County Agronomy Meeting 
December 4, 2019. 8—1:00 p.m.
211 Maple Ave, Chestertown, MD.

Register by calling the Kent County UME Office at 410-778-1661.

Washington County Crops Conference 
December 5, 2019.  9:30—2:30 p.m.
Fairplay Firehall, 18002 Tilghmanton Rd, Fairplay, MD.

Register by calling the Washington County UME Office at 301-791-1304 or jsemler@umd.edu.

Northern Maryland Field Crops Day
December 5, 2019. 9—3:00 p.m.
Friendly Farms, Foreston Rd, Upperco, MD.

Register by calling Baltimore County UME Office at 410-887-8090.

Carroll County Mid-Winter Farm Meeting
January 16, 2020. 9—3:00 p.m.
Burns Hall, Carroll County Ag Center, Westminster, MD.

Register by calling the Carroll County UME Office at 410-386-2760.

Cecil County Winter Agronomy Meeting 
January 29, 2020. 9—3:00 p.m.
Calvert Grange, Rising Sun, MD.

Register by calling the Cecil County UME Office at 410-996-5280 or dbehnke@umd.edu.

Lower Shore Agronomy Day 
January 22, 2020. 8—3:00 p.m.
Somerset Civic Center, Princess Anne, MD.

Register at the Wicomico County UME Office at 410-749-6141.

Harford County Mid-Winter Agronomy Meeting
February 11, 2020. 9—3:00 p.m.
Deer Creek Overlook at Harford 4-H Camp, 6 Cherry Hill Rd, Street, MD.

Register by calling the Harford County UME Office at 410-638-3255 or akness@umd.edu.

Caroline County Agronomy Day 
February 19, 2020. 4:30 p.m.
Caroline County 4-H Park
8230 Detour Rd, Denton, MD.

Register by calling the Caroline County UME Office at 410-479-4030.

Montgomery-Howard-Frederick Agronomy Day 
February 20, 2020. 8:30—3:00 p.m.
Urbana Fire Hall, 3602 Urbana Pike, Frederick, MD

Register by calling the Frederick County UME Office at 301-600-3576.

Queen Anne’s Agronomy Day 
February 28, 2020. 8—1:30 p.m.
Queen Anne’s County 4-H Park

101 Dulin Clark Rd, Centreville, MD.

Register by calling the Queen Anne’s County UME Office at 410-758-0166 or jrhodes@umd.edu.

Forage Meetings

Delmarva Hay and Pasture Conference
January 14, 2020. 9—3:30 p.m.
Delaware Ag Week. Harrington, DE

Southern Maryland Forage Conference
January 15, 2020. 8—3:30 p.m.
Baden Fire Hall, Baden, MD.

Register: call St. Mary’s UME Office at 301 475-4484.

Tri-State Hay and Pasture Conference
January 16, 2020. 9—3:30 p.m. Location TBA

Register by calling the Garrett County UME office at 301-334-6960.

Central Maryland Forage and Livestock Conference
January 17, 2020. 9—3:30 p.m.
Jefferson Ruritan Center, Jefferson, MD.

Registration information TBA.

Vegetable Meetings

Central Maryland Vegetable Growers Meeting 
January 23, 2020. 9—3:00 p.m.
Friendly Farms, Foreston Rd, Upperco, MD.

Register by calling UME Baltimore County Office at 410-887-8090

Eastern Shore Vegetable & Fruit Meeting 
February 11, 2020
Eastern Shore Hospital Center, Cambridge MD

Register:https://2020esvegmeeting.eventbrite.com or by calling the Dorchester County UME office at 410-228-8800.

Southern Maryland Vegetable and Fruit Meeting
February 6, 2020
Bowie Elks Lodge #2309, Gambrills, MD

Register by calling UME Anne Arundel County office at 410-222-3906

Urban Farmer Winter Meeting
January 26, 2020 (tentative date). Baltimore, MD.

Contact Neith Little: nglittle@umde.edu 410-856-1850×123

Fruit Meetings

Western Maryland Fruit Meeting 
February, date TBA. 8—4:00 p.m.
Western Maryland Research and Education Center, Keedysville MD.

Register email sbarnes6@umd.edu or call 301 432-2767 ext.301.

Bay Area Fruit Meeting 
February, date TBA. 8:30—3:30 p.m.
Wye Research and Education Center, Queenstown, MD.

Registration: call 410-827-8056

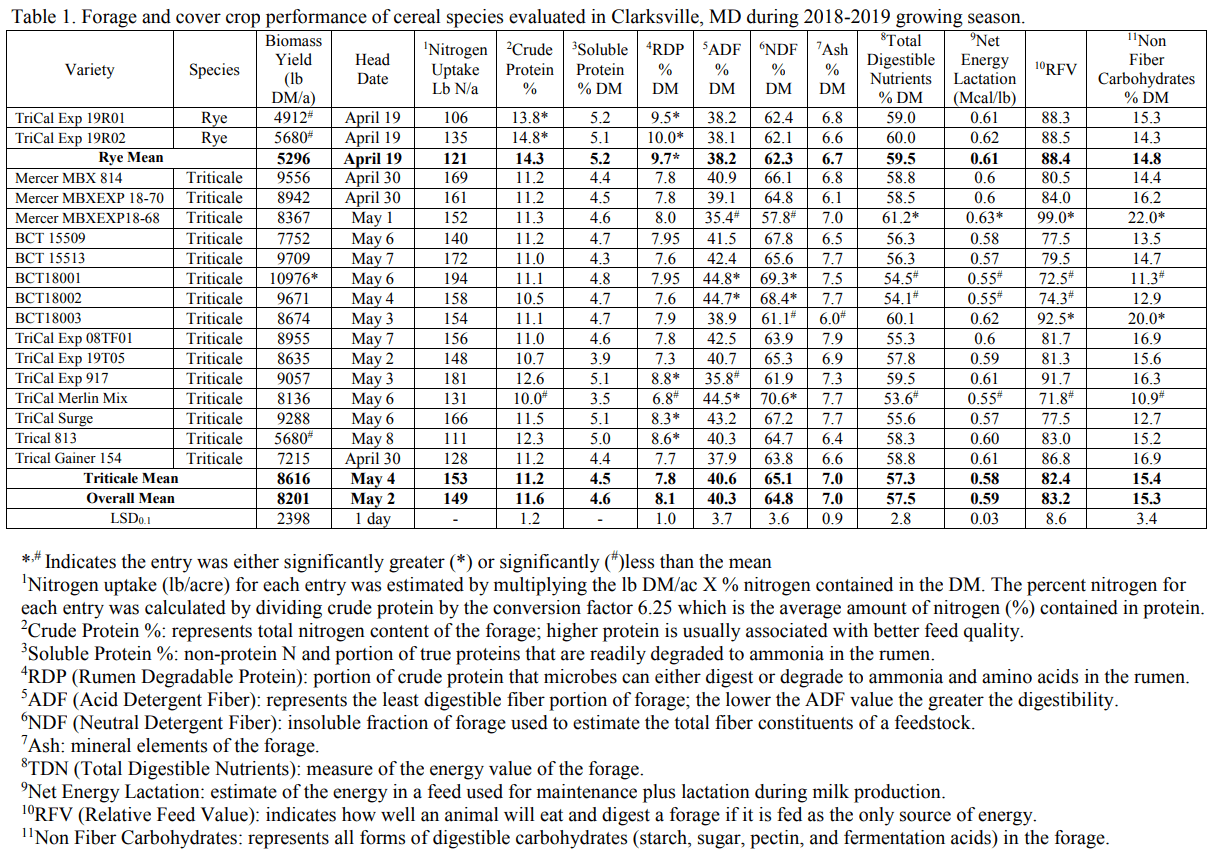
Forage Performance of Cereal Cover Crops in Maryland: 2018-2019 Results

Nicole Fiorellino, Extension Agronomist
University of Maryland

Dairy farmers are constantly looking for sources of forage to meet their feed needs. One source that many of this region’s dairy farmers utilize is the fall planting of cereal grains that are green-chop harvested the following spring. Among the cereal species used for this purpose are rye, triticale, barley, and wheat. Per the Maryland Cover Crop Program guidelines, cereal grains planted as a cover crop prior to November 5 and suppressed via green-chop in the spring are eligible for the grant payment for participation in the Cover Crop Program. In addition, per the Nutrient  Management Regulations, a fall application of dairy manure is allowed to a field planted to a cereal cover crop.

Planting a cereal cover crop that will be green chop harvested fits well into the crop rotation used by many dairy farmers. The scenario that many follow is to plant the cereal cover crop following harvest of corn silage. Prior to planting the cover crop, an application of manure is made to the field. The subsequent planting of the cover crop provides incorporation of the manure into the soil. The fall and spring growth of the cover crop is supplied nutrients from the manure. At the same time, the cover crop provides protection to the soil from loss of nutrients via leaching and/or erosion. The objective of this study was to evaluate select varieties of cereal species for cover crop performance and forage production and quality.

Cereal varieties (17) representing two species (rye and triticale) were evaluated at Central Maryland Research and Education Center – Clarksville Facility. Three replications for each entry were planted using a randomized complete block experimental design. Planting date was October 10, 2018. The 3’ X 18’ plots were planted with a small plot planter with 6-inch spacing between each of the 7 rows. The germination percentage for each entry was used to calculate the seeding rate needed to establish 1.5 million seedlings. Good stands were established by late fall.

In order to compare forage quality among the entries that headed over a period of two weeks, the timing of the spring biomass harvest was when the entries had reached late boot to early heading stage of development. The two rye varieties were harvested on April 23, while the triticale varieties were harvest on either May 1 or May 6, basing on heading date (Table 1). Each harvest sample was collected by cutting the plants just above ground-level from three center rows of each plot from an area 2.5 feet in length and from two areas within the plot. The samples were placed into cloth bags and dried using a forced air dryer set at 60 C where they remained until sample water content was zero. Each sample was weighed and is reported as pounds of dry matter production per acre (Table 1). Each of the dried samples was ground through a 20-mesh screen using a large plant grinder. For each location, the ground biomass samples were sent to Cumberland Valley Analytical Laboratory for standard forage quality analysis.

Cover crop performance is measured by amount of biomass produced and the concentration of nitrogen in the biomass. These two factors were used to estimate nitrogen uptake (Table 1). There was no significant difference in nitrogen uptake among the varieties tested. A number of forage quality characteristics for these cereals was measured (Table 1). The descriptions of the various quality characteristic are described here and in the footnotes at the bottom of Table 1. Crude protein (CP) is the nitrogen content of the forage, with higher protein representing better feed quality. This value was used to calculate nitrogen uptake of each variety (Nitrogen content = % CP/6.25). Both rye varieties had significantly greater CP than the overall mean, with one triticale variety having significantly less CP content than the overall mean. Both rye varieties also had rumen degradable protein (RDP) content significantly greater than the overall mean.

Neutral and acid detergent fiber (NDF. ADF) are measures of feed value and represent the less digestible components of the plant, with NDF representing total fiber and ADF representing the least digestible plant components. Low NDF and ADF values representing increased digestibility; ideally NDF values should be <50% and ADF values should be <35%. One triticale variety had significantly lower NDF and ADF values than the overall mean, representing a digestible triticale variety. This same variety also had significantly higher total digestible nutrients (TD), net energy for lactation (NEL), relative feed value (RFV), and nonfiber carbohydrates (NFC).

The characteristic that best captures the overall forage quality performance is Relative Feed Value (RFV). A RFV of 100 is defined as the forage value that full bloom alfalfa would have. Two triticale varieties had significantly higher RFV than the overall average but both rye varieties also had high RFV values, though not significantly different than the overall mean. Though, none of these green-chop cereal forages are considered to be adequate as a stand-alone feed for a dairy operation, they can supply a source of forage used in a total mixed ration at the time of year when feed supply may be running short. When this forage benefit is added to the environmental benefit that is gained, planting winter cereal cover crops on a dairy farm can be a win-win decision.

Download this publication here.

Stockpiling Pasture for Fall and Winter Grazing

Amanda Grev, Forage Specialist
University of Maryland Extension

It’s August now and whether or not we’re ready cooler temperatures are just around the corner and it’s time to be thinking about winter feeding strategies.  Using harvested forages for winter feed represents a substantial expense for livestock operations.  For many grazing operations, stockpiling can be an effective strategy to extend forage resources further into the fall and winter season, reducing the costs associated with harvesting and storing feed and providing high-quality pasture for fall and winter grazing.

What is stockpiling?

The concept of stockpiling is simple.  Rather than cutting, drying, and storing hay to feed over the winter, existing pastures are allowed to grow and accumulate forage in the field to be grazed by livestock in a later season.  Under this management strategy, grazing animals are removed from pastures in late summer and forages are allowed to accumulate growth through the late summer and fall.  The cool, late-season temperatures make it possible for the accumulation of high-quality forage even after an extended period of growth.  This stockpiled forage is then available for grazing throughout the fall and winter months, reducing the costs associated with feeding stored feeds.

Which forages work best?

Although a number of different forages can be stockpiled, some forage species will hold their nutritional value longer than others in the winter months.  Compared to other cool-season grasses, tall fescue is well adapted for stockpiling, as it has the ability to accumulate a substantial amount of fall growth and tolerate colder temperatures without losing quality.  In addition, the waxy layer or cuticle on the leaves of tall fescue make the plant more resistant to frost damage or deterioration.  Tall fescue also forms a good sod, making it more tolerant to foot traffic and minimizing impacts on its productivity the following season.

How is stockpiling accomplished?

Early August is the time to begin stockpiling for fall and winter grazing.  To prepare for stockpiling, pastures should be grazed (or clipped) down to a 3 to 4 inch stubble height to ensure that the accumulated forage will come from new growth.  After livestock are removed, 40 to 60 pounds of nitrogen fertilizer should be applied to stimulate additional regrowth and optimize forage accumulation and quality.  The grasses should then be allowed to regrow until forage growth dramatically slows or ceases completely.

It should be noted that not all nitrogen fertilizers will be equally efficient when fertilizing pastures in the fall.  In urea or urea-based fertilizers, the ammonia is volatile and a substantial amount of the nitrogen from these sources will be released to the atmosphere via volatilization when applied during the hot and humid days of late summer.  To minimize this volatilization, these nitrogen sources should be applied immediately prior to a significant rainfall event.  Ammonium nitrate is the most efficient source of nitrogen for stockpiling, but it is often more expensive than other sources.

Will yield and quality be good?

Where tall fescue was successfully stockpiled, yields of 1 to over 1.5 tons of dry matter per acre have been documented.  Higher yields will be achieved if nitrogen is applied immediately after the last cutting or grazing compared to pastures that did not receive fertilization or were fertilized later in the fall.

Forage quality of stockpiled tall fescue can be very good.  Depending on how much nitrogen has been applied, fall-grown tall fescue can average 12 to 18% protein and maintain good nutritional value throughout the fall season.  Research has demonstrated that stockpiled tall fescue has sufficient quality to carry dry cows through the winter and could carry lactating beef cows into January without additional supplementation.  However, the forage quality and digestibility of stockpiled forages is variable and will decline as growth accumulates, forages mature, and winter conditions continue.  To confirm nutritional value, forage samples should be taken and analyzed to ensure the pasture is meeting the nutritional requirements of the animals utilizing it.

How to utilize stockpiled forage?

Stockpiled forage can be valuable under a variety of grazing methods, but forage utilization can be increased substantially by using improved grazing practices.  If livestock are allowed to continuously graze the entire pasture with unrestricted access, efficiency will be lower and the potential grazing period will be shortened due to waste and trampling damage.  To minimize waste and get the most from stockpiled forage, pastures should be either rotationally or strip grazed.  Strip grazing is a management system that involves giving livestock a fresh area of pasture every day or every few days by moving a temporary electric fence in the pasture.  This method limits the area available for grazing, helping to increase pasture carrying capacity and maximize forage utilization.

Summary

Removing livestock and fertilizing pastures or hayfields in late summer will allow forage growth to be stockpiled for late fall and winter grazing.  Utilization of stockpiled pasture is an economically-advantageous management strategy that will extend the grazing season, minimize winter hay feeding and stored feed requirements, and provide high-quality forage without negatively impacting the persistence of forage stands.

Summer Grazing Management

Amanda Grev, Forage Specialist
University of Maryland Extension

As we move into the traditionally driest, hottest days of summer, we can expect growth rates of cool-season grass pastures slow dramatically and pasture productivity to decline. However, there are management practices that producers can implement to maximize plant growth during these hot, dry spells.

It takes grass to grow grass.

The key to having productive pastures is optimizing plant photosynthesis. Think of your pasture as a solar panel where green, growing leaves are energy producers. To maximize production, livestock need to be rotated off of a pasture in a timely fashion to ensure an effective “solar panel” or leaf area is left in the paddock following grazing. Most cool-season forages need at least 3 to 4 inches of post-grazing residual to effectively take advantage of photosynthesis for regrowth. In addition to providing a photosynthetic base for plant regrowth, the leaf material that remains after a grazing bout also shades the soil surface, keeping soil temperatures cooler and helping to reduce soil moisture loss.

Removing leaf matter affects the roots as well, as those roots rely on the leaves to supply energy from photosynthesis. The amount of live growth occurring below ground is roughly equivalent to the amount of live growth occurring above ground, and research has shown that the amount of above ground forage mass removed impacts root health. Up to 50 percent of the plant can be removed with little to no impact on root growth. With greater than 50 percent removal, root growth slows dramatically, and removing 70 percent or more of the above ground forage mass stops root growth completely. This is where the old rule of thumb “take half, leave half” comes into play. Leaving half of the leaf area on the plant has minimal impacts to the plant root system, enabling the plant to continue to absorb nutrients and moisture and recover quicker following grazing. If the take half, leave half rule is violated and pastures are grazed too low, plant root growth stops and root reserves are used to regrow leaf tissue, diminishing the vigor of the plant root system and the overall productivity of the plant.

Provide a rest period.

One of the most common mistakes in grazing management is not providing a long enough recovery period for pastures after g razing. Pasture forages require a rest period in order to maintain vigorous production. When a plant is grazed, the loss of leaf material means the plant loses its energy-producing center. The plants’ response is to rebuild that center using stored energy reserves. If the plant is given rest following grazing, new leaves will develop and will replenish this energy supply. Without rest, the plant is not able to replenish its energy supply and will continue to use the remainder of its stored energy to produce new leaves. As energy supplies are depleted, the plant will be unable to maintain production and will eventually die, leading to weak stands, overgrazed pastures, and the invasion of weeds or other non-desirable forages.

Maintaining flexibility in your system will allow you to balance the length of the rest period with the plant growth rate and is fundamental to successful grazing management. How long recovery takes will depend on a number of things, including the plant species, grazing pressure, and the time of year. As we get hotter and drier, grass growth rates will slow down and the days of rest required may be much longer than that required during the spring when rapid growth is occurring. Regardless, the rest period must be long enough to allow the plants to recover and grow back to a practical grazing height before livestock are allowed to graze again; for most grasses, this height falls in the 8 to 10 inch range.

To accommodate for this longer rest period, the rotation speed between paddocks will have to slow down. The basic rule is: when pastures are growing fast, rotate fast; when pastures are growing slowly, rotate slowly. Remember that the goal of the rest is to allow young green leaves to maximize photosynthesis.

Don’t ignore seed heads.

A plant that is producing seed heads is undergoing reproductive growth and not putting energy into leafy growth or tiller production. Clipping seed heads from these grasses will allow the plant to return to leafy or vegetative growth, which will increase forage quality and result in more total forage being produced over the course of the season. Clipping will also serve the added benefit of helping to control weed populations.

Seed heads can also be an indication of uneven grazing patterns in your pasture. If selective grazing is occurring, some plants are likely being overgrazed while others not enough. If this is happening, consider adding more divisions or paddocks into your pasture system. This means you will be grazing your animals on smaller areas, increasing the stocking density. A greater stocking density will reduce the amount of selective grazing that occurs, increasing forage utilization and reducing the need for pasture clipping.

While we can’t control how hot or dry summer will get, we can strategically manage the grass we have to help keep summer paddocks productive and growing.