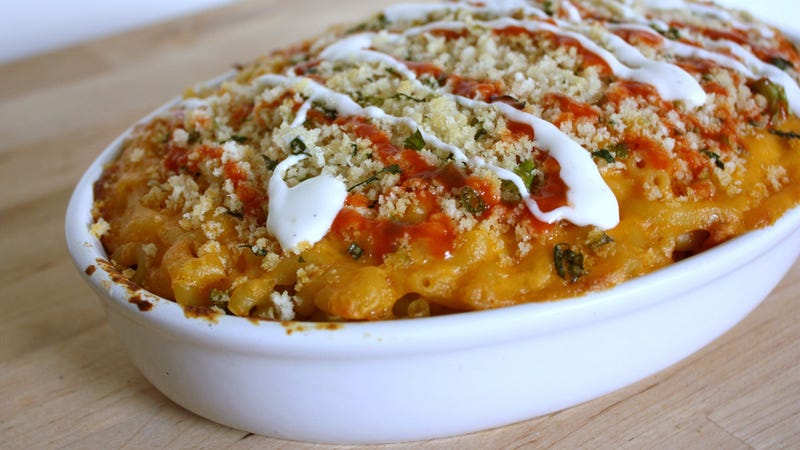
Click the link and ratchet up the trashiness on your next mac and cheese adventure.
Source: http://skillet.lifehacker.com/delightfully-trashy-toppings-for-baked-mac-cheese-1798562676
Click the link and ratchet up the trashiness on your next mac and cheese adventure.
Source: http://skillet.lifehacker.com/delightfully-trashy-toppings-for-baked-mac-cheese-1798562676

Source: http://domesticate-me.com/naked-lobster-rolls/
Instructions
Source: http://skillet.lifehacker.com/you-can-now-use-google-image-search-to-find-recipes-1797507669
Scrolling through pictures of food has always been fun, but you can now use Google image search on your phone to easily find recipes while browsing through your favorite food porn.
The change seems to come from newly supported schema around images and video, but what it means is that you can find tons of delicious looking (and hopefully delicious tasting) recipes using your phone. To do this, one simply:
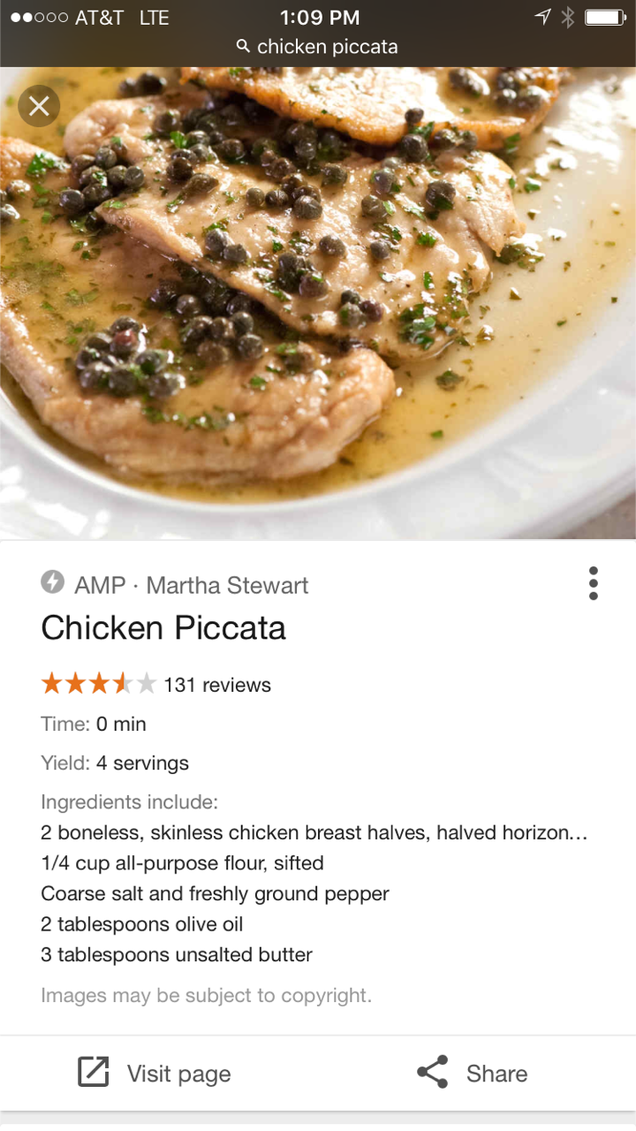
Once you find a recipe you like the look and sound of, you are able to make that delicious-looking image into a delicious-tasting reality, though you’ll probably have to go to the grocery store first.
Google image search now shows videos and recipes | Search Engine
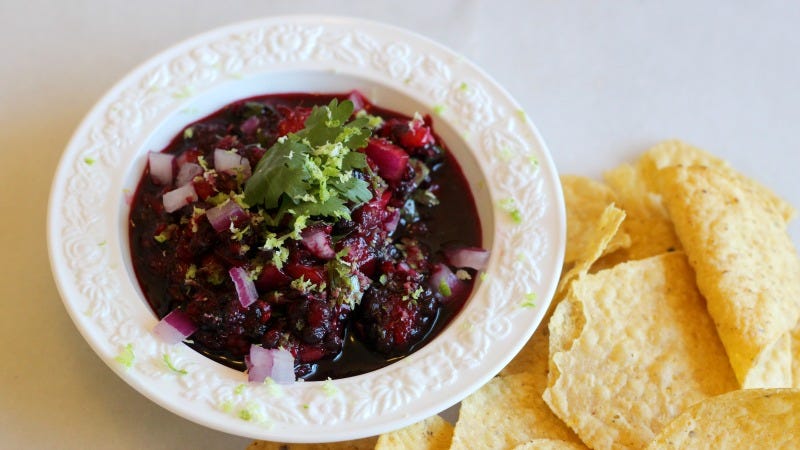
Berry recipes tend to veer towards the dessert end of things, but their juicy, sweet-and-tart nature can brighten up a whole world of savory. If you find your CSA basket runneth over with one particular type of berry—and just don’t feel like turning on the oven for a pie or cobbler—consider making a fresh and fruity berry salsa.

To transform pretty much any berry into a salsa—I say “pretty much” to ward off berry pendanticalness; I know bananas are technically a berry—you will need the following:
The type of berry you use is going to dictate how you proceed, but basically, you want a nice mixture of larger, firm berry pieces, mashed up bits, and extracted juice. I start by mashing up half of my berries with a fork, not so much as to totally obliterate them, but just to get everything nice and juicy.

I then roughly chop or halve the remaining berries or, in the case of blueberries, leave some whole. Mixed the mushed berries with the not-so-mushed berries, and add the onion and cilantro. Stir it all together and let it hang out while you turn your attention to the garlic. Now, you could just mince your garlic, and that would be fine, but I prefer to make a paste. Just peel and slice a couple of cloves, and place them in the bowl of a mortar. Sprinkle on a big pinch of salt (to draw out moisture and mellow the bite), and mash ‘em up with your pestle.

Add the pungent paste to your berry mixture, and give it another stir. Add the lime juice and cumin, and stir once more (with feeling). Taste and adjust your seasoning if needed (maybe just a little salt). If your berries are especially tart, drizzle in a little agave syrup.

Top with lime zest, a few cilantro leaves, and some more onion if you like. Eat as you would any delicious salsa.

I’ve made this salsa with cherries, blueberries, strawberries, and marionberries (pictured above), and all are good. There’s also no need to stick to one type of berry; this is an excellent way to use up an stragglers from other recipes. You could just devour the whole batch with some good corn chips, but I love berry salsa on fish, grilled chicken, pork chops, and skirt steak. Oh, and if you have excess liquid, don’t throw it away. It makes excellent marinades and salad dressing, and I wouldn’t rule out mixing it with a little tequila.
Source: http://skillet.lifehacker.com/how-to-use-up-pretty-much-any-leftover-berries-by-turni-1796995979

This famous Chili was a feature at the recent Graduate School Potluck. It’s delicious – you won’t be disappointed!
Ingredients:
**Patty’s special tip: Add 1 can of drained kidney beans and 1 canned of drained black beans to the chili to make it extra hearty. You can also use cannellini beans if you like, but these are the only types of beans Patty recommends.\
Cooking Directions:
1. Toss everything into a large pot or dutch oven. Stir.
2. Bring chili to a boil, reduce heat to simmer, cover, and let cook for one hour, stirring every 15 minutes to prevent burning. Depending on consistency, add more water as necessary.
3. Enjoy!

Source: https://www.frontiercoop.com/community/recipe/homemade-mexican-street-corn-salad
The corn can be grilled 24 hours ahead of time.

Happy weekend, and welcome back to 3-Ingredient Happy Hour, the weekly drink column featuring super simple yet delicious libations. This week we’re pairing summery strawberries with one of my favorite citrus liqueurs around: Pierre Ferrand Dry Orange Curaçao.
Unlike its violently blue, much sweeter cousin, dry curaçao is balanced and juicy with a nutty warmth and a nice bittersweet flavor. It’s tasty enough to be enjoyed on its own, but I like pairing it with muddled strawberries and fresh lemon juice before pouring it over crushed ice for an almost slushy-like experience. Not only is it the epitome of a summer sipper, it’s a great use for any berries that didn’t make it into a pie.
To make it, you will need:
Muddle strawberries in a shaker and add all other ingredients, along with some ice. Shake vigorously for at least 30 seconds, and strain into a lowball 3/4 full of crushed ice. Garnish with lemon zest from your juicing lemon, squeezing the oils over the finished drink before placing the zest in the glass.
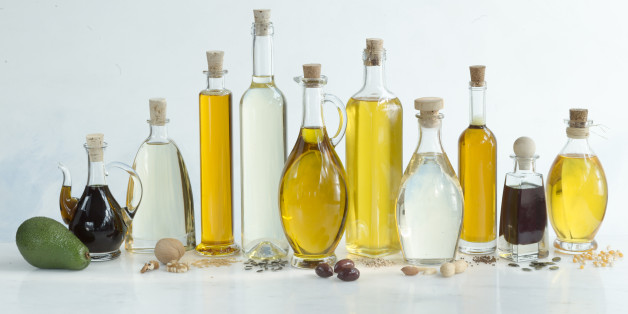
This is a topic that I’ve never really thought about in terms beyond the health advantages of one cooking oil over another. But recently I heard one tv chef discuss the reasoning behind his choice of canola oil for the dish he was creating. Did you know that all cooking oils will start to burn at different temperature (or reach its smoking point – yuck!)? And Extra Light Olive & Peanut oils are at the top end of that scale? (Yeah, that right… you shouldn’t use regular old cold pressed extra virgin olive oil to fry french fries. Who knew?). Well now that I’ve discovered intricacies and characteristics of cooking oil, it is now time for The Hungry Terrapin to get a new post…
(hey!! I wonder if I can become a cooking oil sommelier now??? Nah! but here is an oil stability chart you can reference instead.)
Oh Yeah… You probably should ignore the author of this Huffington Posts article comment’s about “canola oil coming from the seed of the canola plant”. (Because there is no such plant!!! – I know this because I Googled it!!!). That aside, I still think this article is a great primer for any aspiring (on weekends), amateur (I’ll say!), top chef (yeah, right! LOL!) like myself.
Click The Link Already: http://www.huffingtonpost.com/2014/04/03/cooking-oils_n_5076730.html
Enjoy..
Joe
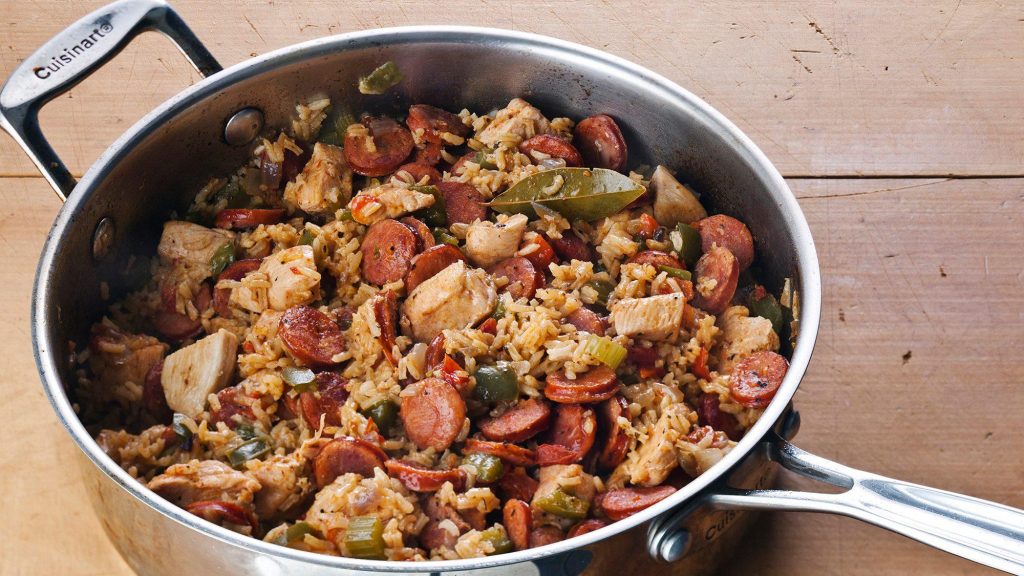
Sausage and Chicken Jambalaya
There are approximately 12,000 variations of jambalaya, with most of them containing the basic formula of several types of meat, rice, stock, hot spices, and giant pot and is grouped into two categories, Creole (red) and Cajun (brown). Creole jambalaya gets much of its flavor from the inclusion of tomatoes while Cajun jambalaya uses a Cajun mirepoix (differing from traditional French mirepoix by substituting of bell peppers for carrots) as the foundation of this “throw everything into the pot” pilaf. Out of the 12,000 variations of jambalaya, approximately 9000 of recipes come from Louisiana’s most famous chef, Emeril Lagasse, so I’ve selected one of my favorites, Sausage and Chicken. It’s a Cajun style jambalaya that forgoes shrimp in favor of ham, cooks up easily and can feed an army.
You will need –
1/2 cup vegetable oil
3 cups chopped yellow onions
1 cup chopped bell peppers
1 cup chopped celery
2 teaspoons salt
1-2 teaspoons cayenne pepper (Cayenne packs way more heat than you think it does, so don’t try to be a hero and add more than 2 teaspoons.)
1-2 tablespoon chopped garlic
1 pound of sausage, cut into 1/4-inch slices (Traditionalists might insist on andouille sausage, but any smoked sausage will do. So of course I used my regional favorite, kielbasa.)
1 1/2 pounds boneless, skinless white and dark chicken meat cut into 1-inch cubes
3/4 pound country ham, cut into 1/2-inch cubes
3 bay leaves
3 cups medium-grain white rice
6 cups chicken stock
1/2 cup chopped green onions
1/2 cup chopped fresh parsleyHeat the oil in a stock pot or Dutch oven over medium-high heat. Add the onions, bell peppers, celery, half of the cayenne and salt, and cook, stirring every so often, until the vegetables are very soft, about 5 to 6 minutes.
Toss in the garlic and cook for 30 seconds so it opens up enough to flavor the sausage, and then throw in the sausage slices and cook until heated all the way through, for about 5 minutes. Be sure to keep stirring and scrap any browned bits that stick to the sides and bottom of the pot.
Season the chicken with the remaining salt and cayenne, then add the chicken and the bay leaves to the pot until the meat is browned, which should take about another 5 minutes. Add the ham and cook, stirring, for 2 minutes and then pour in the 3 cups of rice and heat — still stirring — for another 2 to 3 minutes. (Look for the rice to start to take on a translucent quality.)
Add the stock, stir to combine, and cover. Lower the heat to low and cook without stirring until the rice is tender and all the liquid is absorbed, 25 to 35 minutes. (Don’t feel bad if you have to poke at the bottom of the pot with your big wooden spoon to see how much liquid is left.) Remove the pot from the heat and let stand, covered, without stirring for 10 minutes.
Mix in the green onions and chopped parsley, and serve immediately, removing the bay leaves as you find them.